
Lets see right away what changed with this new version of Vray, I won’t lie to you, practically everything changed, and in better!
This will mean adjusting your workflow and users that don’t love changes will have to adapt and learn using the software again, but don’t worry we are here to help you 😉
I would like to remind you that we are going to talk about the beta version, this means that the final version will have more functions and some changes in the interface.
Lets see how to install the software. Remember that you can also keep 3.7 version installed with the same Cinema4D version where you will install Vray5. There is also a video on how to keep both versions with the same Cinema 4D release(Windows version coming soon).
-ITA: Vediamo subito cosa è cambiato sulla nuova versione di Vray, non userò mezzi termini… praticamente è cambiato tutto, in meglio!
Certo questo richiederà un’adattamento del proprio workflow e gli utenti più refrattari alle novità si troveranno a dover reimparare ad utilizzare il software, ma non vi preoccupate, siamo quì per aiutarvi;)
Vi ricordo che quanto segue riguarda la versione beta del software, sulla versione finale troverete più funzionalità e alcuni cambiamenti nell’interfaccia.
Dunque, vediamo come installare il software , vi ricordo che è anche possibile mantenere installata la 3.7 ma non nella stessa versione di Cinema sulla quale volete installare la 5, potete seguire questa procedura(versione per Windows in arrivo a breve).
Once installed you will find the Vray folder inside Cinema 4D’s plugin. Inside cinema 4D you will only need to select Vray as render engine and you are ready to render. No need to touch anything at the beginning, just concentrate on your work.
-ITA: Una volta installato troverete la cartella Vray tra i plugin di Cinema4d, aperto il programma vi basta selezionare Vray tra i renderer disponibili e siete pronti per calcolare, di base non dovete toccare nulla e potete concentrarvi subito sul vostro lavoro.

I would like to remind you that if you have any doubt on any parameter you can click on it with the right button and select Show Help from the menu. This will take you directly to the description of the feature on Chaosgroup’s online manual.
-ITA: Vi ricordo che nel caso in cui abbiate dubbi su qualche parametro potrete cliccarci sopra col tasto destro e selezionare Show Help dal menù, questo vi porterà direttamente alla descrizione della funzione sul manuale Chaosgroup online.

As you can see the interface has been simplified and totally modified. The frame buffer, that we’ll talk about in depth in the following blog posts, is the place where you will have both your final and interactive renders, you will find it here. To start a render just click on the highlighted button.
-ITA: Come vedete l’interfaccia è stata totalmente rivista e semplificata, il frame buffer di cui parleremo in dettaglio nei prossimi blogpost è il vostro sistema di riferimento per visualizzare sia immagini finali che render interattivi, lo trovate quì, per lanciare i render premete sul tasto evidenziato.

You can activate the denoiser from the main tab, the default one is for final renders and the AI available on Nvidia GPU that will help clean up your interactive renders right away.
-ITA: Potete attivare il denoiser direttamente dal tab principale, avete quello di default destinato ai render finali e quello AI disponibile su GPU Nvidia che vi aiuterà nell’avere immagini immediatamente pulite durante il render interattivo.

From this tab you can also turn on distributed rendering, to insert the slave’s IP addresses click on render host, add IP and click on add server. Something that a lot of people will be happy about is the possibility of loading native Cinema 4D bitmaps even when using DR, this way you won’t have to use advanced bitmap like with older versions of Vray.
-ITA: Da questo tab potrete anche attivare il render distribuito, per inserire gli indirizzi IP degli slave cliccate render host, aggiungete l’IP e cliccate su add server. Una cosa che sicuramente farà piacere a molti è il fatto di poter utilizzare direttamente le bitmap native di Cinema per il DR, evitandovi quindi l’inserimento nell’advanced bitmap come accadeva sulle vecchie versioni.

Next you will find Vray tab where you can choose the type of engine, traditional CPU and GPU available only with Nvidia. Then you can select sampler, progressive or buckets, I suggest to leave color mapping at default values, always best to perform tone mapping through VFB. Even though it is set on Reinhard, color mapping will give you an image in Linear Multiply since the burn value is set to 1.
-ITA: A seguire trovate il tab Vray dove potete selezionare il tipo di motore, quello tradizionale su CPU e quello su GPU disponibile solo per schede Nvidia, a seguire potete selezionare il sampler, progressivo o su buckets, e il color mapping che vi consiglio di lasciare con i parametri di default, sarà sempre preferibile eseguire il tone mapping tramite il VFB. Nonostante sia impostato su Reinhard, il color mapping restituirà un’immagine in Linear Multiply essendo il burn value impostato a 1.
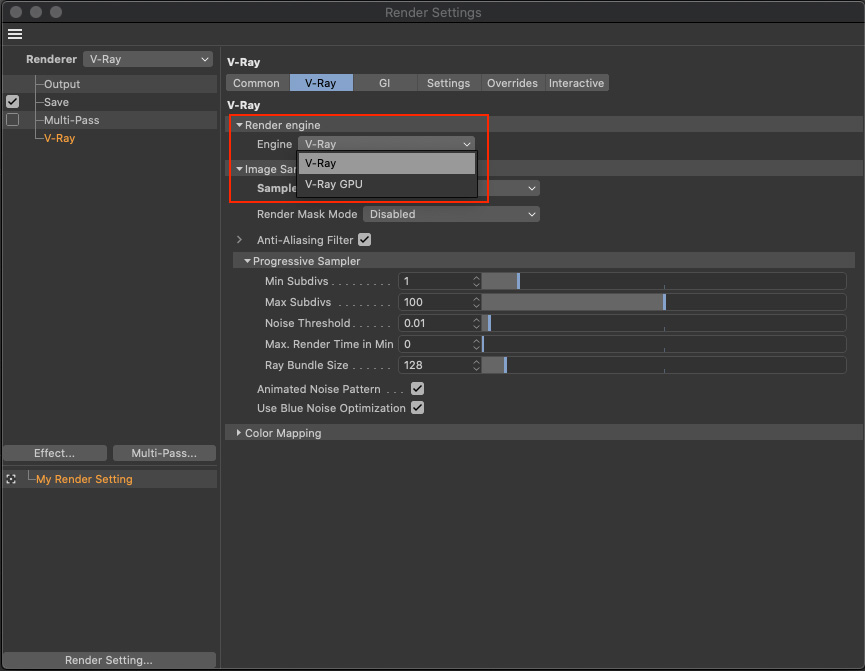

On the following Tab you can select algorithms to calculate GI and caustics. Here as well you can leave default values, same thing in the Settings Tab as you can control displacement locally on each material. Something interesting is the new memory tracking feature, by activating it you can see how RAM is used in various parts of the scene and therefore see if it is misused and fix the issue. Very useful especially when using GPU since resources are limited.
-ITA: Nel tab successivo potete selezionare gli algoritmi di calcolo per la GI e le caustiche, anche quì normalmente non dovrete toccare nulla, stessa cosa nei settings visto che è preferibile controllare il displacement direttamente a livello di materiale. Una cosa interessante è la funzionalità di tracking della memoria, attivandola potrete vedere come viene gestita la RAM sulle varie parti della scena e potrete così osservare se ci sono sprechi di risorse ed ottimizzarli, cosa che tornerà utile soprattutto su calcolo GPU viste le risorse più limitate.


With override you can usually use default values. A couple of interesting tings are autoexposure and auto white balance to always have and ideal exposure, then baking two dimensional shaders is also an interesting feature, it should work for both Cinema 4D and third parties shaders.
-ITA: Tra gli override solitamente dovrete lasciare tutto di default, vi segnalo un paio di cose interessanti, l’autoexposure e l’auto white balance per avere sempre un’esposizione ottimale e la funzionalità per il baking degli shader bidimensionali, sia di Cinema4D che di produttori di terze parti.

With interactive tab you can manage interactive rendering setup both on CPU and GPU. You will be able to slightly optimize calculation speed through performance section. I would like to remind you that the interactive render is now part of VFB2 and you can launch it by pressing the highlighted button.
-ITA: Infine sul tab interactive potrete gestire il setup per il render interattivo sia su CPU che GPU, dipendentemente dal vostro hardware potrete ottimizzare leggermente la velocità di calcolo tramite la sezione performance. Vi ricordo che il render interattivo è ora integrato nell’interfaccia del VFB2 e lo potete lanciare premendo il pulsante evidenziato.

A lot more topics are coming very soon so if you wish te receive our blog posts right in your inbox make sure to subscribe to our newsletter so that we’ll keep you updated.
Best place to share your renders and chat is our private facebook group www.facebook.com/groups/413607146285332 so come join us!
-ITA: A breve posteremo su tantissimi altri argomenti, quindi iscrivetevi per non perdere i vari blogpost iscrivetevi alla nostra newsletter.
Il post migliore dove condividere i vostri render e parlare del nuovo Software è il nostro gruppo privato di facebook www.facebook.com/groups/413607146285332 vi aspettiamo!
Hi Stefano, i write in English because i think it’s a request for other uyser… can you help us with the installation of V5.0 for win users?
Thanks
Giuseppe
Hi Giuseppe, I’ll try to record a video on a Windows system as soon as possible, it should be very similar to the installation process on MacOS though. Remember to download the installer file(not the .zip version), then check if you have installed the Chaosgroup license manager and if it’s working. Le me know;)
We just added the video with Windows
Thanks a lot !!
I miss the installer file 🙁 ( where can I find it ? )
I have the license manager and it’s working